Browse documentation
Members
Settings > Administration > Members. Members are the people who can open the Entity you are in. You decide what each one can see and do.
The Members page is shown to Entity administrators and to Organization owners and admins. Other members do not see it.
How members work
Each member has three things:
- Who: a name and an email address.
- What they can do: an Administrator switch, or a list of permissions by module.
- When they joined: by invitation, or added directly if they already use Invunion in your Organization.
Access is given per Entity. A person can be an administrator in one Entity and have no access to another.
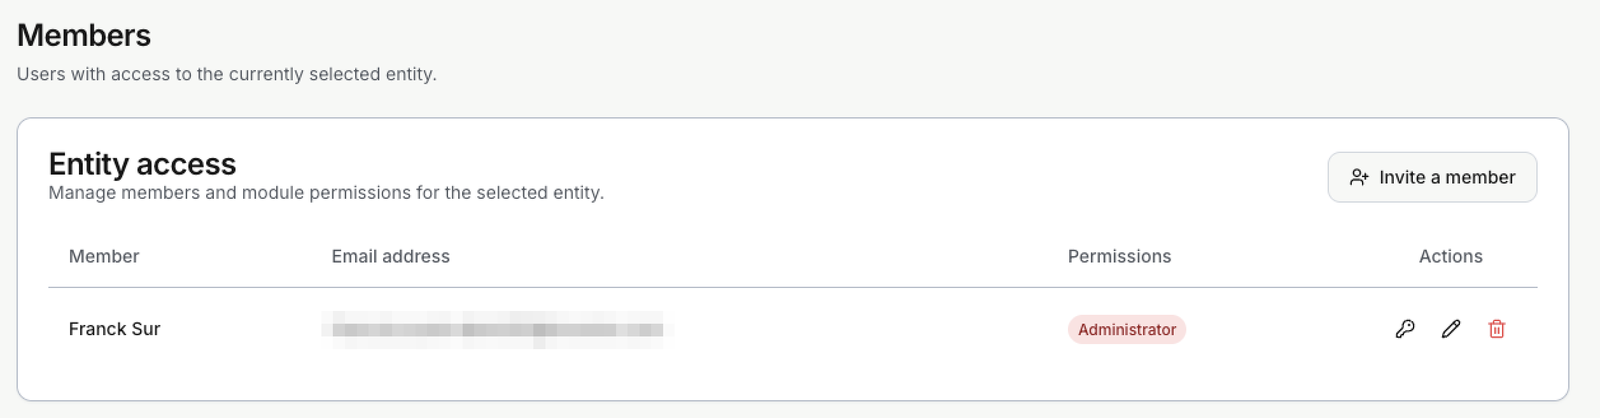
Each line of the table is one member. It shows the name, the email address and a badge for the access. The icons on the right send a password reset link, edit the permissions, and remove the member.
| Badge | Meaning |
|---|---|
| Administrator | Full access to the Entity, including its members. |
| Custom | A mix of permissions chosen for this member. |
| No access | Every permission is switched off. |
| Read-only | The member can look but not change anything. |
Invite a member
Select Invite a member. You can invite one person or several at once.
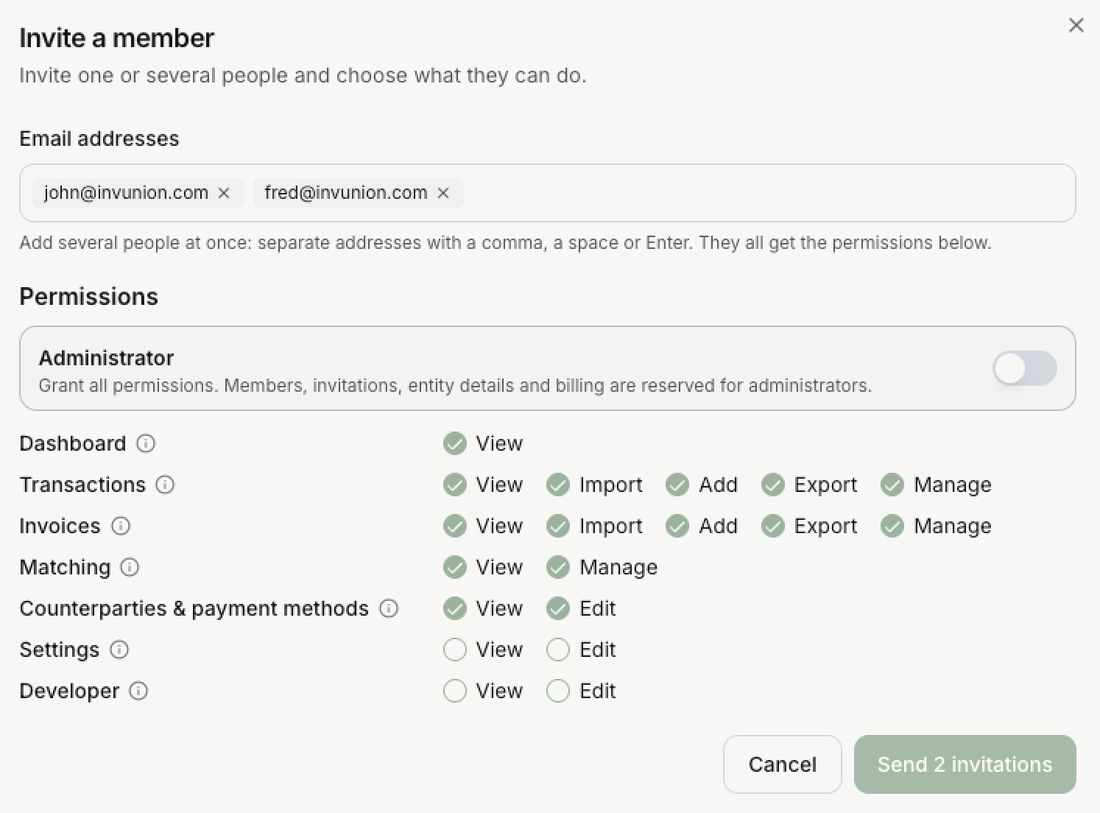
| Field | What it does |
|---|---|
| Email addresses | One or more addresses. Separate them with a comma, a space or Enter. Everyone you add gets the same permissions. |
| Permissions | What they can do. The Administrator switch grants all of them. Otherwise tick the permissions below it. |
Then select Send invitation, or Send 2 invitations when you added two addresses.
- A new person receives an email with a link. They create an account, or sign in, with the same email address, and join the Entity. The link works for 7 days.
- Someone who already uses Invunion in your Organization is added to the Entity at once. No email is needed.
- An address that belongs to another Organization is refused.
- If a pending invitation already exists for the address, you cannot send a second one until it expires or you revoke it.
- Each address is handled on its own. If one is refused, the others are still sent, and the dialog stays open on the refused ones so you can fix them.
- Your Organization has a maximum number of users. Once it is reached, new people cannot be invited.
Permissions
Permissions are grouped by module. Each module has its own actions. Select the i icon next to a module in the app to read what it covers.
| Module | Actions | What it covers |
|---|---|---|
| Dashboard | View | The home page with totals, charts and recent activity. |
| Transactions | View, Import, Add, Export, Manage | Bank transactions: list, file import, manual entry and export. |
| Invoices | View, Import, Add, Export, Manage | Invoices: list, file import, manual entry and export. |
| Matching | View, Manage | The Match inbox. Manage lets the member confirm, reject and create matches. |
| Counterparties & payment methods | View, Edit | Customers, suppliers and the payment methods used with them. |
| Settings | View, Edit | Rules, finance settings, payment schedules, notifications and e-invoicing. |
| Developer | View, Edit | API keys, webhooks, import mappings, bank connections and the audit log. |
A few things to know:
- View only means read-only. A member who can view but not edit sees dialogs in read-only mode and no edit buttons. On Settings, the pages show a notice and every control is locked.
- Administrator switches every permission on and greys them out. Switch it off to start again from nothing.
- Members, invitations, entity details and billing are reserved for administrators. No permission in the grid gives access to them.
Example: a read-only colleague
An auditor needs to read transactions, invoices and matches, but must not change anything.
- Select Invite a member and type the auditor’s email address.
- Leave Administrator off.
- Tick these permissions and nothing else:
| Module | Actions ticked |
|---|---|
| Dashboard | View |
| Transactions | View, Export |
| Invoices | View, Export |
| Matching | View |
| Counterparties & payment methods | View |
- Select Send invitation.
The auditor can open the Dashboard, read and export transactions and invoices, look at the Match inbox, and see customers and payment methods. They cannot import, add, confirm or edit anything. Settings and Developer stay closed to them.
The line in the table shows Custom once they have accepted. Until then the invitation waits in Pending invitations.
Pending invitations
Below the table, Pending invitations lists the invitations that nobody has used yet: the email address, the permissions, and the date the link expires.
Select the bin icon to revoke one. The link that was sent can no longer be used. An expired invitation disappears from the list on its own.
Change, reset or remove a member
- Edit (pencil icon): change the member’s display name, the Administrator switch or the ticks, then select Save. The name is stored on the person’s account, so it changes in every Entity of your Organization.
- Reset password (key icon): sends an email with a link to set a new password to the member’s address.
- Remove (bin icon): the member loses access to this Entity. Their pending invitation, if any, is revoked. Their account stays in your Organization and their other Entities are not affected.
The last administrator of an Entity cannot be removed or demoted. Make someone else an administrator first.
Limits to keep in mind
- Changes apply to the Entity you are in. Select another Entity to manage its members.
- To give a system access instead of a person, create an API key.
Updated · View as Markdown